
Desks
Slant-front Desk
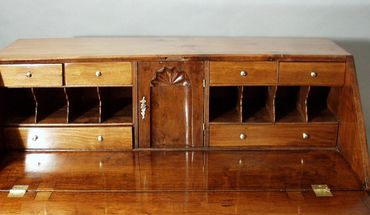
Apart from repairing the usual wood losses and wear on the drawer runners, this early desk needed appropriate feet, molding, and hardware, as well as complete refinishing. On the bottom left is a "before" picture. Note the ghosts of the original pulls under the later replacements. The escutcheon plates were original though missing some scrollwork. The interior had a shell carved in the prospect door and certain construction details seemed to have a Rhode Island flavor so I used the feet and molding profile from a Townsend chest as a model for these restorations (top right). Researching similar objects helps with recreating lost parts and is part of the restoration process.


Empire Secretary
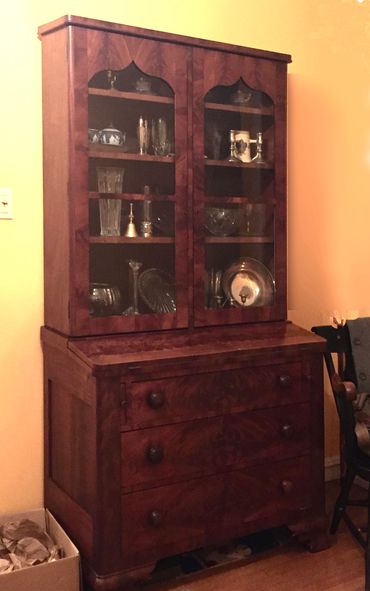

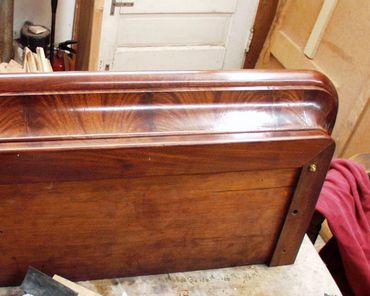

Veneering curved surfaces is always a challenge. In this case, a cove molding had to be fabricated with crotch-grain mahogany to match the remnants of the original cornice. First the substrate for the molding had to be made to the desired shape. Then a mating caul was made that conformed to the molding so it would clamp the veneer in place while the glue dries.
In this particular process, the veneer was glued using hot hide glue. Once I had the veneer initially attached, I added a piece of hot copper between the veneer and the caul so that the glue would remelt allowing the veneer to reposition and form a much better glue line.
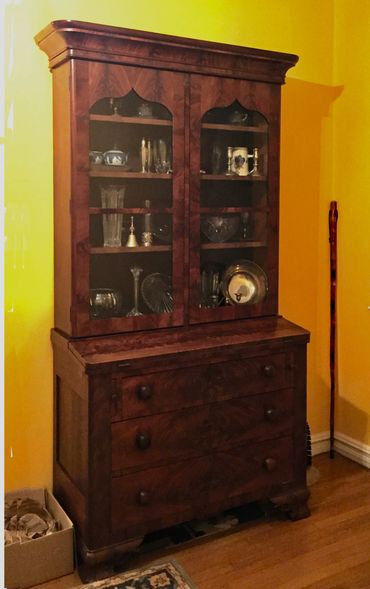
The moldings were then cut to size and assembled onto what remained of the original cornice. Solid mahogany was used for the small cockbead molding, the top molding, and the corners. These exquisite veneers and solid pieces of mahogany were some of my finest mahogany that were waiting for "just the right job."
Clocks
Eli and Samuel Terry Pillar and Scroll Clock
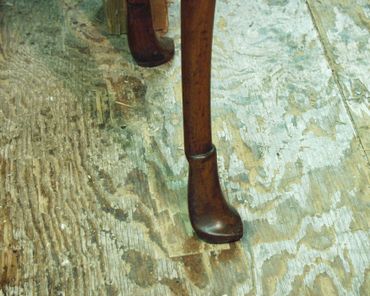
The mantle clock was missing its pediment and feet though an outline and vestiges of glue could be seen on the top and bottom of the case.The owner of this object wanted to present it in its original form. Pillar-and-scroll clocks by Eli and Samuel Terry are sought after antiques and the Metropolitan Museum of Art in New York has one just like this, complete with pediment and legs. Examination of that object allowed me to do a drawing and make the appropriate replacements. The original lock and escutcheon were also missing so I fabricated new ones.
Clocks, more than any other piece of furniture, lose their feet. When the cord holding up a clock weight breaks and the weight falls, it breaks out the bottom of the clock, feet and all. Rather than reglue the broken parts together, some "restorers" come up with alternate designs, losing many of the original components… and much of its value! We are then left guessing what was there. This is where it is necessary to research and find examples of the same or similar designs to make a replacement that is correct for the style and age of the object. It should be finished to match the original but, upon close inspection, should not "fool" anyone into thinking it is original.

Eli and Samuel Terry Clock

Clock case restoration
This wonderful clock had fallen due to a failure of the joint between the waist and base, a common problem on clocks. Seasonal changes in humidity cause the wood to expand and contract but cross-grain construction between the sides of the waist and the molding cause the glue line to eventually fail… with catastrophic results! While all the original wood could be glued back together, the glass had to be replaced. I salvage old glass with its wavy and seeded character to use for just these situations. Fortunately, the clockworks suffered not a bit, though twenty pounds of weights did quite a number on the lower case. All standing clocks should be fastened to the wall to prevent the clock from falling.

Time Flying!
This is the result!
No repair for glass!
This will need to be replaced with old glass.
Gluing and Clamping
Gluing and Clamping
Often the gluing process requires assembly in stages.

Tables
William and Mary Table
William and Mary tables often exhibit wonderful uses of veneer of both domestic (England) woods and exotics. This table was no exception with Italian olive combined with native ash. During its lifetime it was refinished with a dark, thick shellac coating obscuring the wood. Once that layer was removed, the subtle colors of these beautiful woods were once again visible under a thin, light-colored French polish.

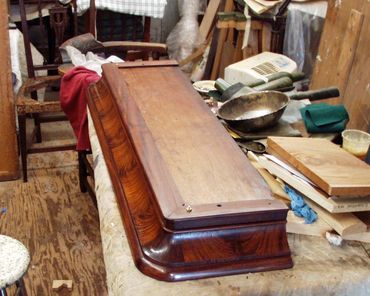
Queen Anne Card Table
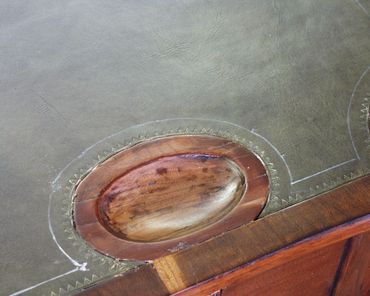
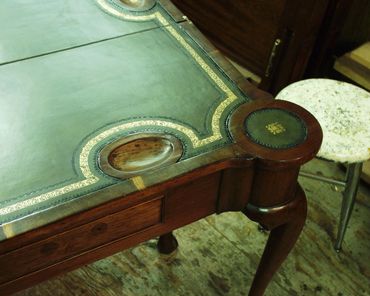
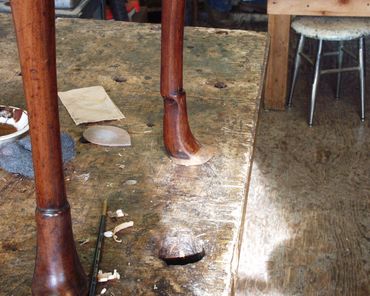
A Queen Anne card table with unusual feet came into my shop needing complete restoration from repairing extensive veneer losses to restoring the original height to both back legs. Every attempt was made to keep the original material and shape intact. The additions were spliced on to existing surfaces with epoxy with hide glue as a barrier coating to allow for future retreatment.The new wood was carefully carved to match the existing profile. Tooled leather was substituted for the typical felt playing surface and the finished surfaces were cleaned and polished with French polish (shellac applied with a pad).


Chest of Drawers
French Commode
I had restored this commode over 25 years ago but time and climate was not kind to it. Many veneers had been lost and water damage was obvious on the lower half. However, the construction is the the big reason for the bulk of the damage. Veneers run at whatever angle that the patterning demanded without regard to the angle that the substrate runs. Seasonal movement eventually caused the failure of the glue line. As you can see, the sides have large splits where the glue joins on the limewood substrate have failed and opened up. Any veneer bridging that split, failed, either by breaking or becoming unglued from one side or the other. It is useless to fill the crack with anything solid as these are de facto expansion joints. Any attempt to fill or glue these cracks will not only fail but will further compress the wood the next seasonal cycle. I made the decision to saw any veneer bridging the gap and leave the gaps to open and close with the seasons, preventing future veneer losses.

Gluing veneer required rewetting the old glue line, introducing fresh hide glue in through the cracks and clamping with a hot caul. This remelts the old glue line and clamps the veneer flat. I should say, flat-ish, as every surface on this commode was a compound curve!
More clamping! Everyday, more glue, more clamping. Even after refinishing with French polish, there were areas that needed a little glue and clamping.

This view shows the chest before delivery, without the marble top. The shellac put on 25 years ago was removed and redone with the same process, French polish.
The veneers are a sampling of Dalbergia species—tulipwood, Brazilian rosewood, Burmese rosewood, kingwood, along with amaranth and olivewood. Wenge and sycamore were used for the string inlays.

Upholstered Furniture
Repairing, restoring, and preserving upholstered furniture frames are some of the most challenging tasks that come into the shop. Often the frames are loose and require complete removal of the fabric and foundation in order to repair them properly. Also, as common, are frames that are tight but have a break or one loose join. Sometimes with this type of repair, only the area around the problem will need to be disassembled.
Having started my career in an upholstery shop, I am all too aware of some of the shortcuts used to "tighten up" a frame—from working yellow glue into a join to "shooting" dowels in from the side. Inevitably these repairs fail in short order. Worse, the repairs can further damage the frame, making future restoration that much more invasive. Often, new wood is needed to replace broken tenons or reinforce mortises. The photo above is not the worst case, it is typical!
Historically important furniture requires a more conservative approach, sometimes attaching the foundation to a sub-frame in order to keep the original frame from further invasive fasteners.

This Arts-and Crafts side chair had been reupholstered so many times that the client and I decided to make an insert or squab that would hold all the foundation and material. This squab was made to fit into the frame. A shallow recess provided a place for extra cushioning. It was then covered in canvas so the show material could be sewn onto it.
The squab from the back. Note the filler on the original frame, consolidating the "shredded wheat" caused by repeatedly attaching the back fabric as well as the foundation and front cover with tacks. Everytime they wanted to change the fabric, everything had to come off and new material reattached. It doesn't take too many "re-ups" to shred the wood.
The finished treatment. Now the squab takes all the upholstery fasteners, preserving the frame. To change fabric, the squab is removed (four small screws) and the sewing undone. New fabric, front and back, can be sewn on without undoing the foundation.
The upholstered side chair pictured had all manner of restorations from metal plates to gluing and stapling cardboard. Worse, the last upholsterer cut a ⅛" deep groove around the leg to house the welt. This reduced the cheeks at the bottom of the mortise by half, leaving only ⅛" of wood between the outside of the frame and the tenon at that spot.
This shows the damage done by weakening the mortise with the groove.
A series of splices were used to compensate the losses, reinforce the area, and eliminate the groove.